Logitech moved into the next era with the 2015 redesign. The brand was bold enough to leave part of its legacy in the past — the eye logo in particular — and moved in a modern direction. This was the message to be communicated to the audience in the MX Vertical project. And I had the right fast-paced and dramatic visual story for it.
Modeling
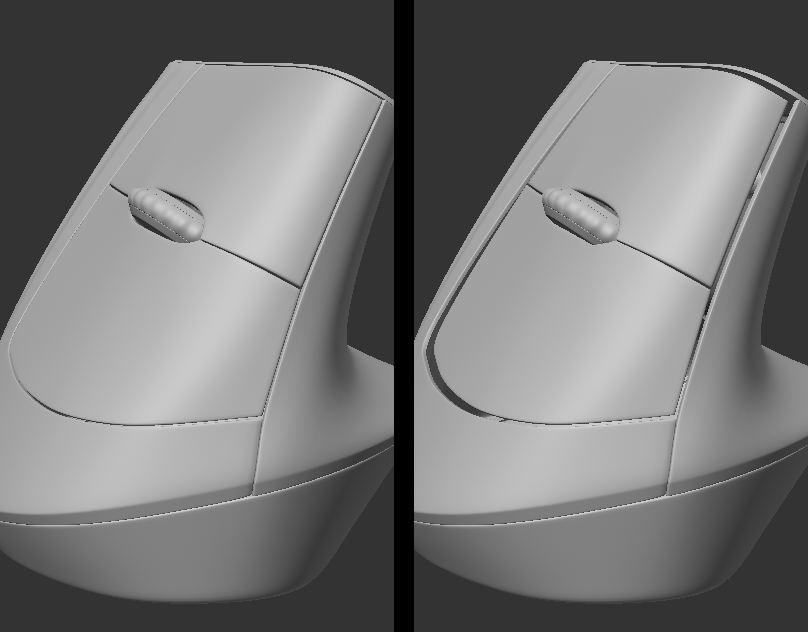
The mouse was created in Cinema 4D using the hard surface modelling technique. The process was tricky since the device has an organic, non-symmetrical shape with a sloped top part. With some additional sculpting this became the initial blob.

The shape is the key selling feature of MX Vertical so I had to be precise in replicating all the tiny details. Those include a three-piece scroll wheel, ribbed body shape and non-symmetrical mouse buttons.

There is a trick I used to make the model feel real. The 3D geometry looked too perfect which is impossible in real life. So I distorted the mouse buttons a bit, creating uneven gaps between them and the device's body.
3D model can be accessed on Sketchfab
Collecting references
Strangely enough only after the model was complete, I started looking for sources of inspiration to build the commercial. Obviously, I looked at Apple and their clean video aesthetic. Such cinematography style creates a sharp focus on the product itself. One particular video stood out.
The key concept I was coming back to was “dramatic”. MX Vertical has an unusual shape, which I wanted to highlight with deep contrast and extreme angles. This is when I found the following reference. The video has blinding white light and harsh dark shadows with a punchy green accent. Replicating this aesthetic allowed me to include Logitech’s brand colour.
The problem was that my draft came together empty and disconnected from potential customers' reality. I continued my search on YouTube, Pinterest and Vimeo. The following reference gave me an idea of a final shot. We will transition into the real room, with the mouse landing on a user’s table.
Mood board can be accessed on Miro
Lighting and Blocking
The initial cut was created using collected references. I rebuilt the shots around the MX Vertical model. As the video would be fast-paced, I opted for simpler frame compositions and lighting schemes. Most of the shots were done using a 100-150 mm lens to create a portrait effect and focus more on the "hero".

However the cinematography was too stale. To spice things up I used a wide 15 mm lens for this particular shot. Not only did it add drama, it also emphasised the unusual product's shape. To add a colour punch I came up with the idea of laser scanning the MX Vertical's surface.

I wasted a lot of time pursuing the wrong idea. Since there were shots focusing on the product’s details, the “transformer” effect could work. A draft was built, where the mouse was coming together from pieces. Realising how ugly and hollow the sequence was, I gave up on the idea.

The table shot took the longest to rebuild, since there is a lot of geometry and textures in the frame. Another tricky sequence to figure out was flying through the light tunnel. I wanted to include a Star Wars-esque moment, but it felt cheap. It was swapped for a tunnel of clones. Using silhouettes of the models saved time due to faster Arnold rendering.

Post Production
Compositing was done in After Effects. I wanted to push things further with editing, so a plethora of tricks were used to make the video snappier. For example, as we fly into the mouse wheel the edges of the frame get distorted and blurred out. As the camera passes through the tunnel of clones each frame lasts twice as long. This in turn lets the viewer keep track of what's happening while not sacrificing the momentum.

Following the tech concept, I came up with a pixelisation transition. Since I always render out the backgrounds and foregrounds of my shots separately, I controlled which parts of the image got pixelated. This preserved clarity while transitioning quickly.

During color grading I added more imperfections to the image, blooming out highlights. Realness was also achieved through sound design. A number of sound effects stock websites were used to build the audio image and add depth to the visuals. I found a dramatic track on Artlist.io and trimmed it using Logic Pro X. A trick that made the music hit even harder was layering additional bass SFX under the main track.
The project took me a month to complete, while employing most tools in my current skillset. I believe the result is worth it. What do you think?